USP <797> revisions, effective November 1, 2023, increased the monitoring requirements of air and surfaces for microbial contamination.
Environmental Monitoring Solutions
Eagle offers comprehensive environmental monitoring (EM) solutions that assist pharmaceutical facilities, including 503B outsourcing facilities, and 503A compounding pharmacies, achieve regulatory compliance with relevant industry standards. Environmental monitoring is a key element in ensuring that aseptic processing areas are maintained in an adequate state of control and cleanliness to minimize the risk of microbial contamination through the production of sterile products. Data collected through the EM program is not only intended to remediate actionable excursions but also support an organization’s overall contamination control strategy by enabling them to proactively respond to adverse trends and optimize operations including the cleaning and disinfection program. Viable sampling of air, surfaces, and personnel is an essential component of the environmental monitoring program.
Featuring Eagle's
EM Plates & Kits
Eagles offer tryptic soy agar (TSA) plates that are ideal for the recovery of a wide range of microorganisms, including bacteria, yeast, and fungi. Our 90 mm settle plates are suitable for passive air and personnel monitoring, while our 65 mm contact plates can be utilized for active air, surface, and personnel monitoring.
Features and benefits of our TSA plates include the following:
- Supplemented with neutralizers, Lecithin and Tween 80, to deactivate disinfectants present in the environment.
- Convenient room temperature storage to eliminate the need for refrigerated storage conditions.
- Gamma-irradiation to ensure a high level of sterility and minimize the risk of false positives or false negative results.
- Self-locking mechanism to ensure the integrity of the sample during handling and transportation.
- Triple-wrapped for quicker movement through ISO-classified areas.
- Include a certificate of growth promotion from the manufacturer and a verification of growth promotion testing performed by Eagle.

How To Collect A Viable Sample

Viable Air Sample
- Configure the air sampler to collect 1,000 L (1 m³) of air.
- Select a contact plate or settle plate as defined in your facility-specific standard operating procedures (SOPs).
- Position the air sampler in the pre-determined sampling location.
- Label the underside of the media plate (not the lid) with pertinent sampling information in accordance with your facility-specific SOPs, which may include the following:
- Sampling date and time
- Sample location
- Sampler equipment ID if more than one air sampler is used in the facility
- Initials of personnel collecting the sample
- Associated sampling event, i.e., production lot number, etc.
- Remove the air sampling head, then load the media plate into the air sampler.
- Open media plate by removing lid with care, not to touch the agar surface with ANY form of contaminants.
- Replace the air sampling head.
- Start the air sampler to collect the sample.
- Upon completion, carefully replace the lid on the media plate, taking care not to touch the agar surface with fingers or any other contaminants.
- Unload the media plate from the air sampler.
- Repeat as applicable.
Surface Sample
- Select a contact media plate.
- Label the underside of the media plate (not the lid) with pertinent sampling information in accordance with your facility-specific SOPs which may include the following:
- Sampling date and time
- Sample location
- Initials of personnel collecting the sample
- Associated sampling event, i.e., production lot number, etc.
- Open the media plate by removing the lid, taking care not to touch the agar surface with fingers or any other contaminants.
- Make contact with the surface by gently rolling the media onto the sampling surface and apply firm, even pressure to ensure good contact. This technique shall also be used for personnel sampling of sites other than gloved-fingertips.
- Cover the plate by replacing the lid, taking care not to touch the agar surface with fingers or any other contaminants.
- Clean and disinfect the sampled area to remove media residue.
- Repeat as applicable.


Gloved-Fingertip Sample
- Select a contact plate or settle plate as defined in your facility specific standard operating procedures (SOPs).
- Label the underside of the media plate (not the lid) with pertinent sampling information in accordance with your facility-specific SOPs which may include the following:
- Sampling date and time
- Left hand or right hand; only one media plate shall be used per hand.
- Personnel identifier, i.e., initials.
- Associated sampling event such as production lot number, garbing validation attempt, media-fill lot number, etc.
- Open the media plate by removing the lid, taking care not to touch the agar surface with your fingers or any other contaminants.
- Applying light pressure, gently roll each fingertip pad and thumb onto the agar surface. Only one hand shall be used per media plate. DO NOT SANITIZE GLOVED HANDS PRIOR TO COLLECTING GLOVED-FINGERTIP SAMPLE.
- Cover the plate by replacing the lid, taking care not to touch the agar surface with your fingers or any other contaminants.
- Discard and/or replace gloves as necessary.
Environmental Monitoring Facts
Incubation
Upon sample collection, plates shall be incubated in a qualified and continuously monitored incubator, inverted, as follows:
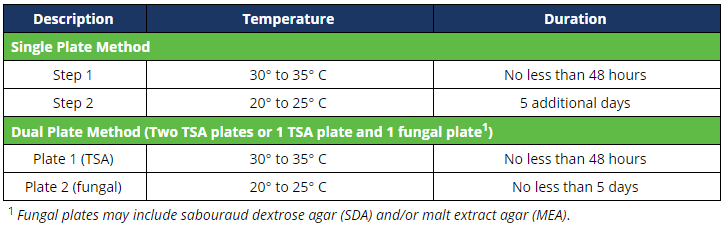
Don’t have a qualified incubator? Contact an Eagle Client Care team member to learn more about our incubation services and/or our equipment qualification services.
What’s On Your Plate?
Although microbial identification of recovered microorganisms is not explicitly required in the revised USP <797> chapter and the 503B outsourcing facility guidance, the characterization of recovered microorganisms provides a holistic picture of a facility’s state of environmental control.
It is best practice to perform microbial identification for all samples exceeding their respective action limit and should be considered for microorganisms recovered in all critical areas regardless of CFU count.
This data can be especially useful when investigating sterility and media-fill test failures, personnel monitoring excursions, facility certification failures, and adverse trends. Additionally, microbial identification can aid in the optimization of the cleaning and disinfection program and the improvement of aseptic operations.
To learn more about our microbial identification services, contact Client Care today.
Microbial Enumeration and Action Limits
Upon incubation, remove the media plate(s) from the incubator and count the total number of discrete colonies on the agar surface. Microbial enumeration should be performed in a well-lit area using a magnifying glass or a colony counter device. Personnel performing this function shall be trained and qualified.
Record the number of colony forming units (CFUs) per plate on your facility-specific log. Results shall be evaluated against your facility-specific alert and action limits.

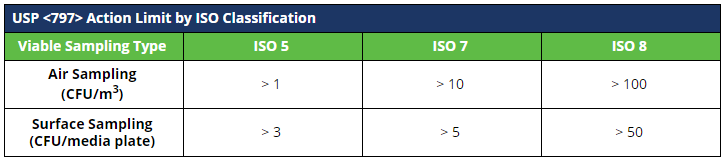
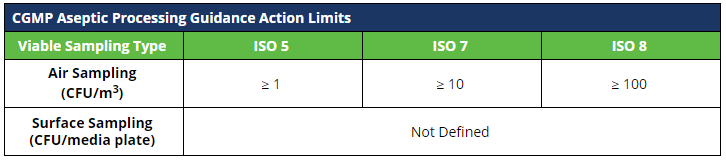
Action limits for viable sampling at 503B outsourcing facilities are not defined in the Guidance for Industry.
Eagle provides microbial enumeration services or can offer training for your staff by one of our qualified microbiologists. To learn more, contact a member of our Client Care team today.
Harness The Power of Trending
An effective EM program should encompass an evaluation of environmental data to proactively identify adverse trends. Our feature in EagleTrax, Shield Analysis, enables you to trend data by your defined inputs in the Microbial Identification submission, which may include location, operator, microorganisms, process, etc.
Identified adverse trends shall be investigated, promptly corrected, and procedures shall be implemented to prevent their recurrence.
Learn more about Shield Analysis and our various process control chart offerings.
Revised USP <797> Environmental Monitoring Requirements
The revised USP <797> chapter, effective November 1, 2023, introduces new categories, 1-3, for compounded sterile preparations, in lieu of the low, medium, and high-risk compounding categories. The table below defines the updated requirements for viable air, surface, and personnel sampling with respect to the categories the facility intends to compound.

What about Environmental Monitoring Solutions for Hazardous Drugs?
All organizations that handle hazardous drugs (HDs) including but not limited to pharmacies, hospitals, outsourcing facilities, and manufacturers should test for surface contamination, in accordance with USP <800> Hazardous Drugs – Handling in the Healthcare Setting and the Food and Drug Administration’s (FDA) Insanitary Conditions at Compounding Facilities – Guidance for Industry.
The newly published revisions, chapters <795> and <797> of the United States Pharmacopeia (USP) explicitly require that facilities handling hazardous drugs comply with the requirements in the chapter, making USP <800> compendially applicable. Additionally, all FDA-registered manufacturers governed by Current Good Manufacturing Practices (CGMP) must verify and validate the efficacy of their cleaning programs to minimize the risk of cross-chemical contamination.
SurfaceShield Wipe Sampling and Cleaning Verification Kit offers a customizable, easy, and cost-effective solution for the detection of drug residues on surfaces. This multipurpose kit includes everything you need to collect wipe samples including:
- A customizable number of sample sets (2 Texwipe® swabs, 2 collection tubes, 2 single-use vials of sterile water, 2 templates (100 cm²), and 1 pair of gloves).
- One 3 oz. single-use ice pack
- Sampling instructions card
- Blank labels
- Insulated mailer
What, When, and Where should I test?
All surfaces that are at risk for surface contamination shall be tested. A risk assessment shall be performed to determine the areas and drugs to be tested. This table includes typical sampling areas with respect to the activities performed.
- Hazardous drug containers
- Receiving and storage area floors, shelves, or walls
- Countertop
- Counting equipment/tray
- Pharmacy floor
- Computer keyboard/mouse
- Hazardous drug vials or containers
- Interior of the BSC/LAFW/powder containment hood
- Areas adjacent to the BSC/LAFW/powder containment hood (floors, walls, etc.)
- Areas adjacent to the HD room
- Pass-through chamber
- Staging area
- Weighing area
- Mixing area (work surface, floors, walls)
- Equipment
- High-touch areas (doorknob, door handle, pen, keyboard/mouse)
- Preparation area
- Bedside equipment
- Carts
- Shelves
- Waste containers
- Floors and walls
Wipe sampling shall be performed initially to establish a baseline of surface contamination, then no less than every six months to verify containment. It is best practice to test more frequently in the initial stages of the wipe sampling program and adjust the frequency of testing depending on the obtained results.
Additionally, wipe sampling for the purpose of validating a cleaning procedure shall be performed in triplicate before and after cleaning has been performed for each drug and/or drug class as determined by the facility. For more information regarding cleaning validation and the additional requirements to comply with the Code of Federal Regulations (CFR), schedule an initial consultation with one of our Eagle Consultants.
Eagle currently offers testing for commonly compounded and manipulated hazardous drug active pharmaceutical ingredients (APIs) identified on the NIOSH (National Institute for Occupational Safety and Health) List.
Available Drug List for Testing
| Hormones | Chemo Drugs | Hazardous Drugs | Non-Hazardous Drugs |
|---|---|---|---|
| Estradiol | 5-Fluorouracil | Apomorphine | Ascorbic Acid |
| Estriol | Carboplatin | Azathioprine | Tadalafil |
| DHEA | Cisplatin | Finasteride | |
| Estrone | Cyclophosphamide | Chloramphenicol | |
| Ethinyl Estradiol | Cytarabine | Colchicine | |
| Hydroxyprogesterone | Daunorubicin | Fluconazole | |
| Methyltestosterone | Doxorubicin | Methimazole | |
| Progesterone | Gemcitabine | Oxytocin | |
| Testosterone | Ifosfamide | Spironolactone | |
| Testosterone Cypionate | Methotrexate | Tamoxifen Citrate | |
| Testosterone Propionate | Irinotecan | Tretinoin | |
| Topotecan | Zonisamide | ||
| Vincristine |
Order your SurfaceShield Wipe Sampling and Cleaning Verification Kit on our Shop page today!
Let Our Experience Work For You
Cutting-Edge Our Laboratories
Eagle’s cutting-edge 80,000-square-foot facility and laboratory are equipped with advanced technologies and specialized segregated laboratory spaces to meet the diverse needs of our clients. This behind-the-scenes video provides you with an opportunity to witness testing while touring our laboratory.